
Picture this: it’s 10 p.m, Friday evening, the kettle’s hissing like an angry boiler sprite, and your boss (Jeff) just came over, “Could we, uh, have a mobile app for that SharePoint list by Monday?” using that “SharePoint Power Apps” thing.
You roll your eyes, “classic Jeff”…. god no wonder no one likes him what a douche. In the pre-Power Apps dark ages, you had two options:
- Panic-buy an expensive off-the-shelf solution, or
- Convince the management overlords they never needed an app in the first place (bonus points if you used interpretive dance).
Thankfully, today we have Microsoft Power Platform. If you’ve got a Microsoft 365 licence and a bit of curiosity, you can build an app faster than it takes to drink that coffee you just made. No code? No problem.
In this walkthrough, we’ll take a humble SharePoint list and transform it into a three-screen SharePoint Power Apps. By the end, you’ll have:
- A modern multi function Canvas app (Browse, Detail, Edit)
- A working SharePoint connection
- Enough confidence to smile knowingly at the next “We need an app” request from that bloody Jeff…
So grab your digital toolkit, the coffee is optional but strongly recommended and let’s turn a blank canvas into a functional app and show Jeff what a god of computing you actually are!

Section 1 – Gear check: setting up the SharePoint Power Apps playground
Before we don our developer capes, we need a playground for our data that will be captured by our awesome app.
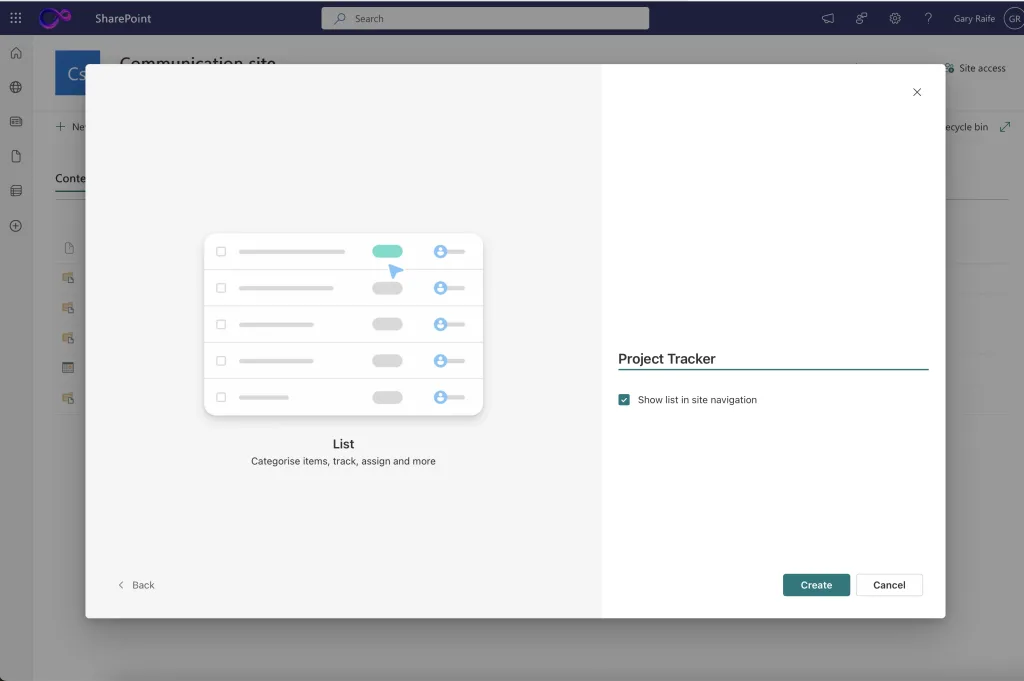
1. Create (or borrow) a SharePoint site, (Not from Jeff, he’s a tool)
- Go to your new site and open Site Contents
- Select New → List → Blank list (call it Project Tracker).
- Add columns: Title (single line), Status (choice), DueDate (date), Owner (person)
2. Check permissions
- Ensure you can read/write the list.
- If testing with a colleague, add them to the Members group.
Now our data is sorted its time to have an app good time, and build us a funky front end to help manage our data, or as Jeff calls it “One of them app things”
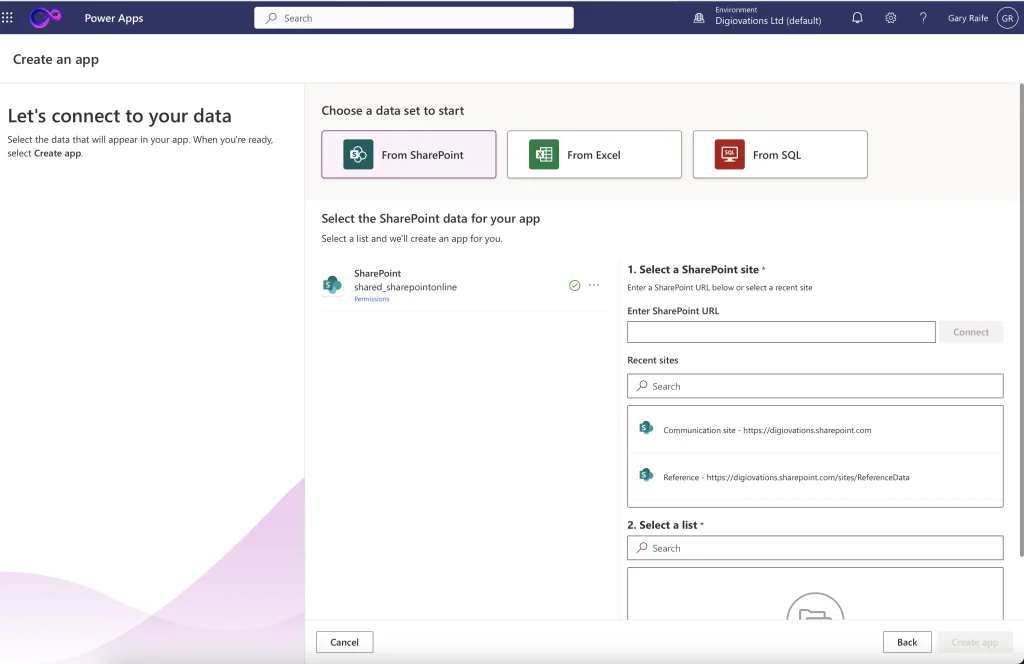
3. Launch Power Apps Studio
- Go to make.powerapps.com
- Select Apps → + Create → Start from data → Connect to External Data → SharePoint
- Authenticate, paste your site URL, and tick the ProjectTracker list.
- Click Create App
Section 2 – The power of auto-generation
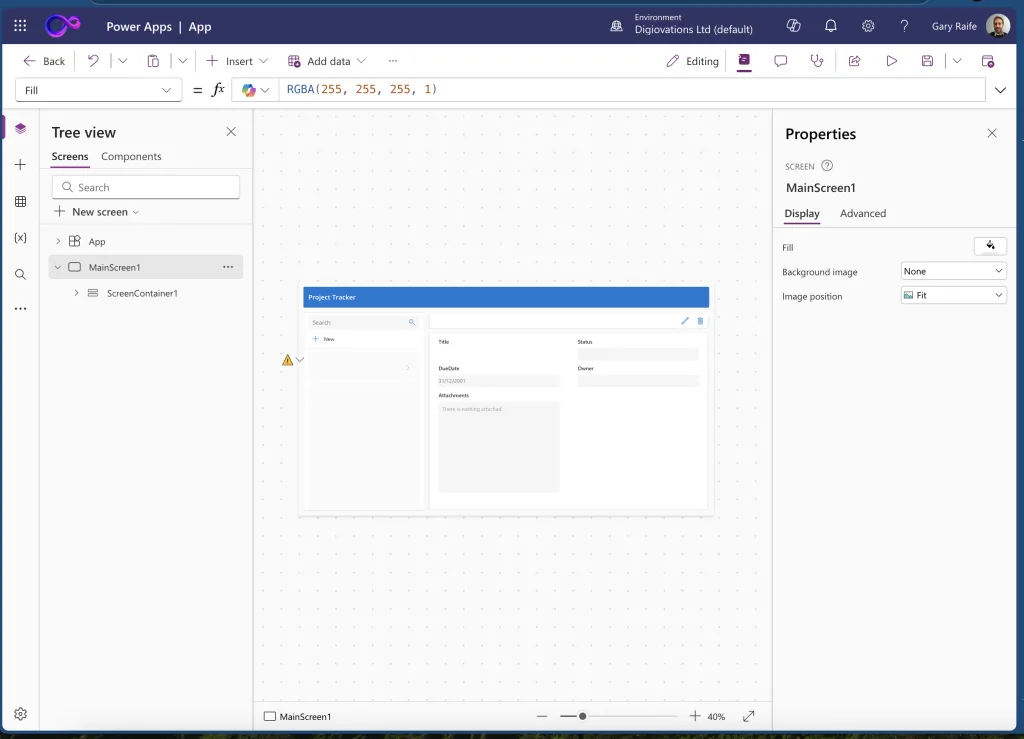
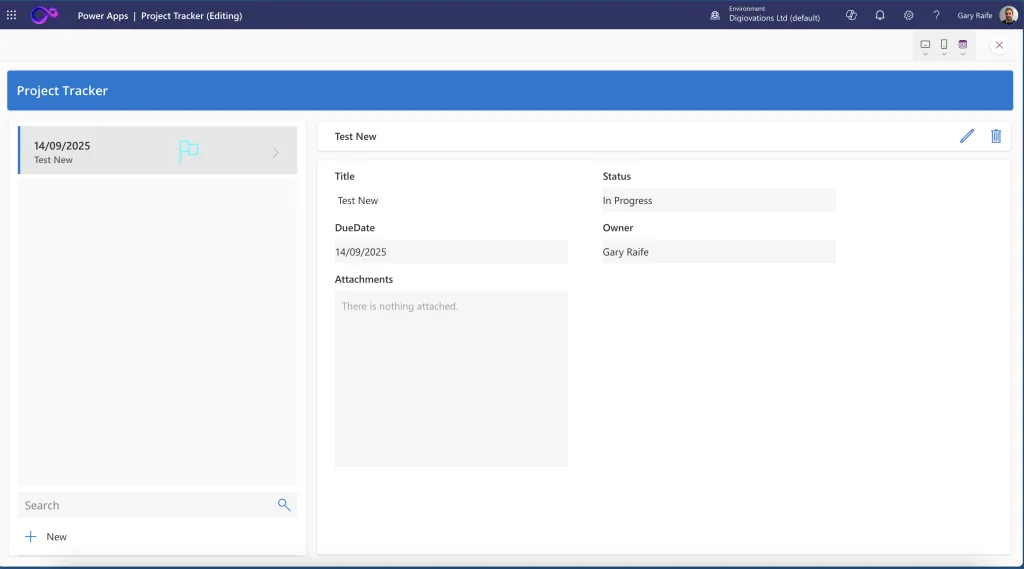
Once you connect the list, Power Apps flexes its AI muscles and generates a fully wired app to enable you to manage your data, and it even helpfully auto generates the main screens and containers:
- MainScreen1: Main view in which all the components of our new app sit
- ScreenContainer1: separate areas for the header and the application body
- BodyContainer1: additional containers for the sidebar & main content
So the first time you see this, it feels like wizardry, but of course we tell Jeff, that this took hours to craft, but we don’t want to give him the satisfaction of finding out we just gave him somthing just out the box no do we, so lets have a look at how we can make some customisations.
Thankfully PowerApps has your back here, by using the helpful properties dialog section we can change the settings and configuration of the on screen components with ease, so lets make a few changes:
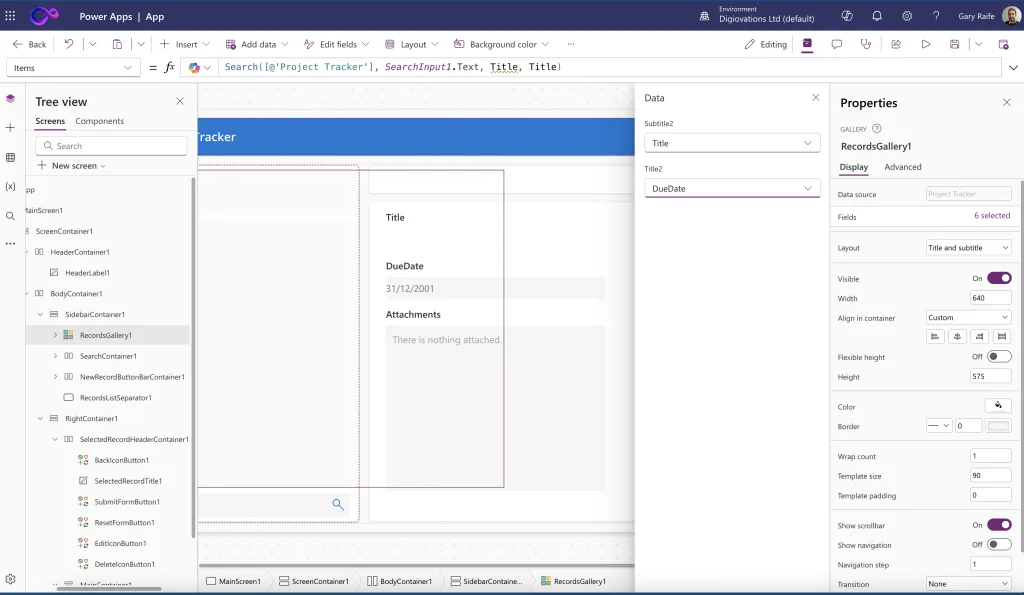
- Rename the container TableNameContainer to HeaderContainer and Label to HeaderLabel1
- Expand BodyContainer1 → SidebarContainer1 then click on RecordsGallery1 → Layout → Change it into “Title and Subtitle” format
- Swap the Title2 field to show DueDate.
- Click on the save icon and give your app a cool name like “Project Tracker”
Section 3 – Branding without a budget
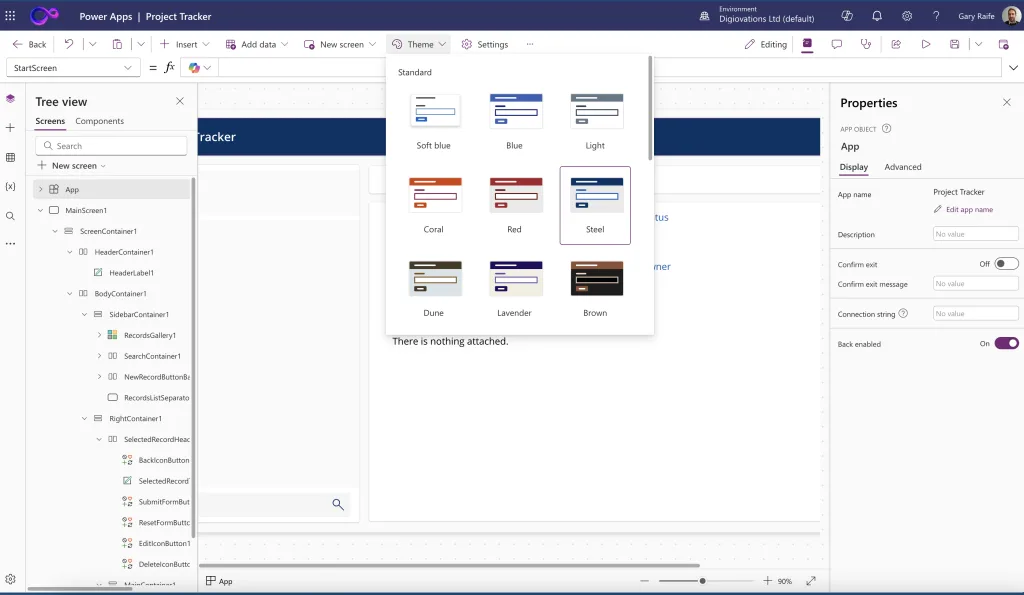
So now we have made the tracker list look a-bit better let’s focus on the visuals, unfortunately Jeff’s no dope, you don’t get to a middle management position without a bit of nouse, so he’s all to aware a default palette screams “auto-generated in 2 minutes.” Let’s add polish:
- Pick a cool new theme
- Home → Theme → choose one (I like “Steel” it’s Blue (steel)).

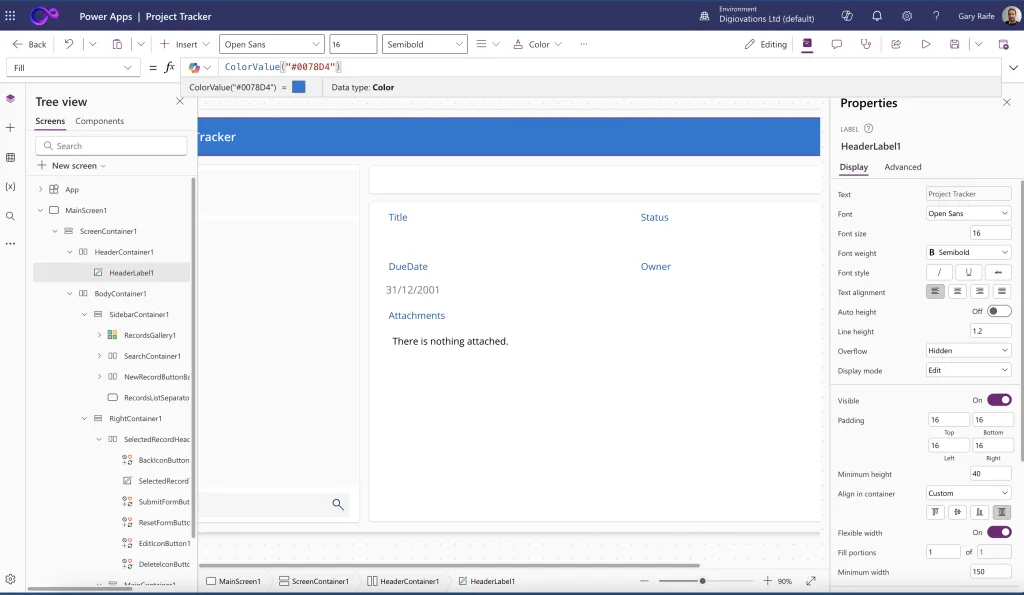
With the overall theme sorted, we can add some more flair to the header and icons, in fact we can user the various properties to make things match without having to use colour codes on everything, lets explore this:
- Update the header
- Click on the Header Label from the component tree view , Label under HeaderContainer.
- Fill = ColorValue(“#0078D4”) (classic Microsoft blue).
- Select the Text: “Project Tracker” and change the font to Segoe UI Semibold, 24pt, white.
- Re colour Icons
- Select all icons on the Record screen.
- Set their colour to HeaderLabel1.Fill.
Section 4 – Making It Feel Alive

Now we have covered the basics of app changes and properties using the visual dev tools it’s time to go for a little bit of code, it’s still low code but just a touch, I’m mean we want to put Jeff back in his box, so it’s time for a little Power Fx magic.
- Let’s tweak the search results, so that the results are sorting in ascending order this is easily doable, through a slight change to the code which populates the results for the gallery.
- Click on the gallery item from the tree view and amend the code in the items property to, (RecordsGallery1.Items):
- =SortByColumns(Search([@’Project Tracker’], SearchInput1.Text, Title, Title),”Title”,SortOrder.Ascending)
- =SortByColumns(Search([@’Project Tracker’], SearchInput1.Text, Title, Title),”Title”,SortOrder.Ascending)
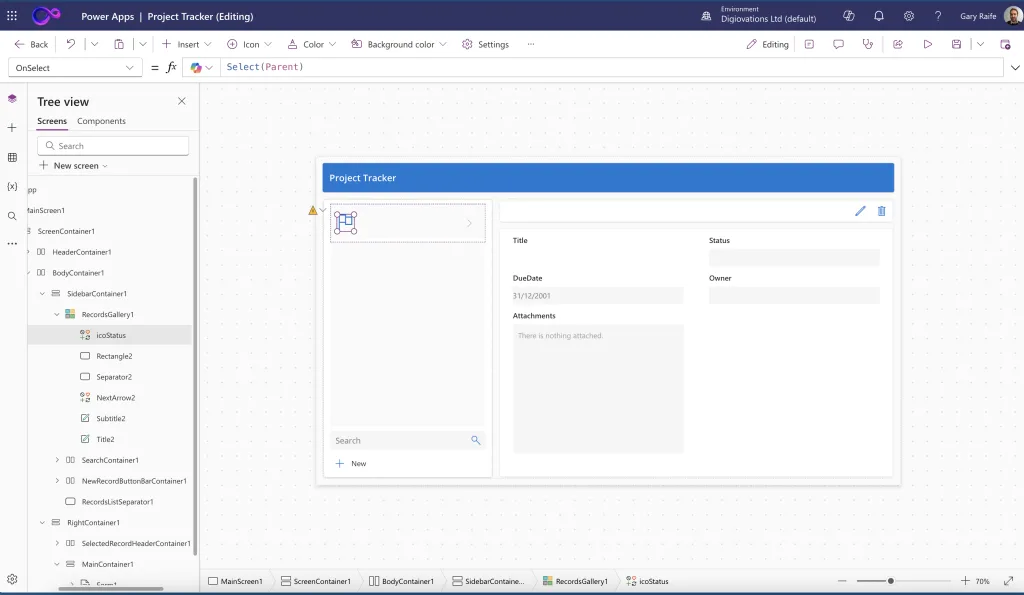
Now we can use some simple code to change the colour of an icon based on some values from SharePoint, cool for a status flag icon, I mean how could Jeff not be impressed!
- Dynamic status colour coding, here we go.
- Click on the pencil icon on the Gallery in the TreeView
- Click the + icon to insert a flag icon and call it (icoStatus).
- Change the icoStatus.Color property = Switch(ThisItem.Status.Value, “In Progress”, Color.Aqua, “Closed”, Color.Bisque, “Blocked”, Color.Red, “New”, Color.Green, Color.Beige)
Finally we can also use some simple code to update the display properties of the new form view for editing and viewing a Project Tracker entry.
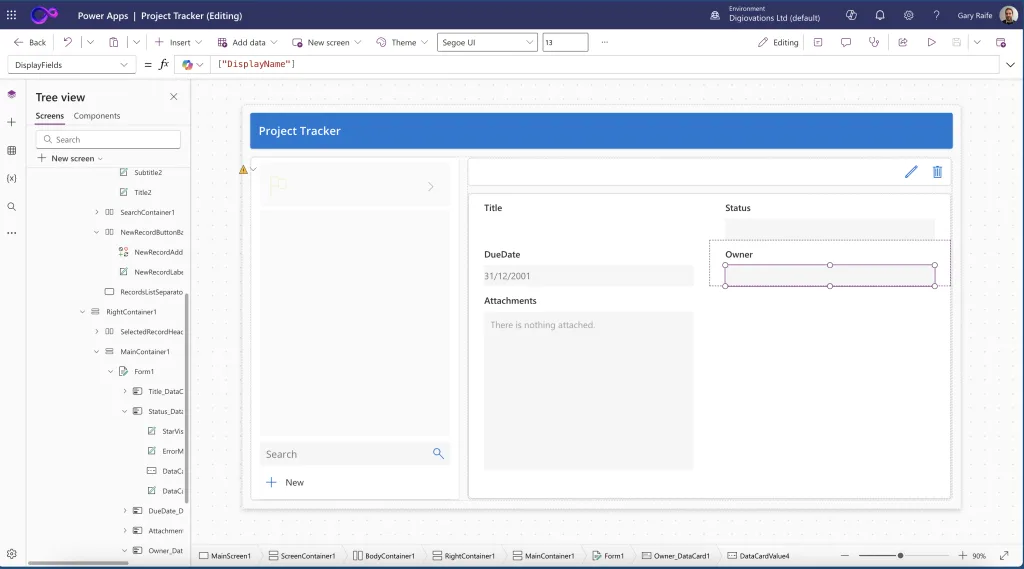
- Change the Owner field to show the user name not Claims
- Ctrl Click on the New button at the bottom of the Gallery
- This takes the app into the New Form mode
- Click on the owner data card and the drop down field
- In the card properties click the unlock icon
- Change the DisplayFields value from [“Claims”] – [“DislayName”].
Section 5 – Test, Publish, Celebrate
Now it’s time to test and publish our new app, I mean look at it, a masterpiece of low cod excellence, how could Jeff not like this, I mean he doesn’t like much but hey thats his problem.
- Test in Play mode
- Now we can create a record, edit it, delete it through our cool new app, Click the start button add a record and confirm updates flow to the SharePoint list.
- Run App Checker
- Fix warnings like missing accessibility labels, app checker will check the app for anything that might cause a problem.
- Save & Publish
- File → Save → add a version note (“Initial build”).
- Publish → Publish your version and away you go.
- Share the app
- From the app list, select … → Share.
- Add Jeff; assign him as Co-owner if they’ll extend it, but he won’t he is too boomer to use Power Apps
- Try it on mobile
- Ask a Jeff to open it in the Power Apps mobile app. Watch his jaw drop.
Section 6 – Where to go next!

Your first app is live—now what? Well you can tell Jeff to do one, thats for sure , now that you have some new found skills you can find an employer that will appreciate your ability and treat you better! And if you want to go abit more in depth you can follow up with the below:
- Using Patch() – to master data updates enabling you to write to multiple sources in one go
- Offline capabilities – Use LoadData/SaveData for disconnected scenarios.
- Power Automate – Trigger flows to notify Teams when projects are blocked.
- Component libraries – Reuse that snazzy header everywhere
- Solution – Package your app and move it from dev → test → prod.
And there it is—your very first Power Apps Canvas app, spun from a SharePoint list with a dash of curiosity. What looked intimidating an hour ago is now just another tool in your kit—like duct tape or Ctrl+Z.
Keep experimenting, keep breaking things (safely), and share your war stories.
Your next late-night “We need an app” request from Jeff might just turn into a portfolio piece instead of a panic attack, so hand Jeff your
